Start here
MojoScale Setup Guide
Connect Modbus equipment to live values, alarms, and history using a small RS485 gateway.
MojoScale is for practical remote monitoring when full SCADA is too expensive or too heavy for the job.
Fastest setup path
Most users should start with a built-in profile.
Choose tested ESP32-S3 RS485 gateway hardware.Use a listed board or a generic ESP32-S3 with the correct 8MB/16MB flash size.
Pick the built-in profile for your controller, meter, UPS, genset, VFD, heat pump, or chiller.Choose the vendor/model that matches the machine.
Keep the recommended metric set.Start with the default alarms/statuses and primary values.
Flash the gateway from the browser.Use Chrome or Edge with the gateway connected by USB.
Connect RS485 A/B and power.If there is no response, try swapping A and B.
Verify live values locally.Compare 3 to 5 obvious values against the controller display.
Confirm cloud data in MojoScale.Check recent telemetry, readable statuses, alarms, and history.
Create a custom profile only if your device is not already covered.
Before going on site
Bring:
Supported ESP32-S3 RS485 gateway.
USB cable.
Laptop with Chrome or Edge for flashing.
Wi-Fi name and password, unless using AP-only mode.
Access to RS485 A/B terminals.
Controller or meter model number.
Built-in MojoScale profile, or the manufacturer Modbus register map.
What success looks like
Success means the gateway reads live values locally, and the MojoScale cloud page shows recent data with readable alarms/statuses.
What you need
Confirm the machine can be monitored
MojoScale works best when the machine already exposes operating data over RS485 / Modbus. The gateway does not invent values;
it reads values the controller already provides.
Field topology
Genset, meter, UPS, VFD, heat pump, chiller, or machine controller
RS485 A/B
MojoScale ESP32-S3 gateway
Wi-Fi / MQTT
MojoScale cloud console
Phone / browser dashboard
Supported equipmentAny supported Modbus RTU device with known registers: gensets, meters, UPS systems, VFDs, heat pumps, chillers, inverters, protection relays, pumps, and sensors.
Needed from the machineController model, Modbus address if known, baud rate if known, and register map if the device is not built in.
Expected setup timeBuilt-in profile installs should be a finite field task. Custom profiles take longer because values must be mapped and verified.
When MojoScale may not workNo RS485/Modbus access, locked controller data, unknown register map, unstable wiring, or a device that does not expose the values you need.
Easy path
Quick setup with a built-in profile
This is the path most users should take. Do not create a custom profile unless the built-in profile does not match your device.
Create or choose a siteUse the customer/site where the machine is installed.
Add gatewayName the gateway clearly, for example `plant-a-genset-1` or `panel-room-meter`.
Select equipment profileChoose the category, vendor, and model that matches the controller or meter.
Keep recommended metricsStart with active alarms/statuses and the most useful scalar values. You can change selected values before flashing.
Flash gatewayConnect USB, select the right hardware or flash size, then run the browser flashing flow.
Confirm local and cloud readingsVerify the local data page first, then confirm recent telemetry in MojoScale.
For a genset, good first values are battery voltage, frequency, RPM, coolant temperature, oil pressure, fuel level, run hours, and active alarms.
Gateway
Gateway wiring and flashing
Hardware setup should feel concrete: USB flashes the gateway, RS485 connects to the controller, and Wi-Fi or AP mode makes data reachable.
USBUsed for flashing from the browser. Keep the cable connected until the setup modal finishes.
PowerUse the board power range from the product page. Many tested boards support terminal power for panel installs.
RS485 A/B/GNDConnect A/B and ground where available. Labeling is not always consistent between manufacturers.
AP fallbackAP-only mode keeps the gateway reachable locally even without site Wi-Fi or cloud access.
RS485 labels are not always consistent. If the device does not respond, try swapping A and B before changing the profile.
What success looks like
- The flashing modal reaches the final step without an error.
- The gateway reports Wi-Fi/AP mode as expected.
- The local `/status` endpoint reports the Modbus address and baud rate.
- The local `/data` endpoint shows current values or active statuses.
- Cloud mode shows a recent reading in the MojoScale console.
Before leaving site
Verify live values
Prove the install before you leave. Do not rely on one successful flash message; compare live data against the machine.
Gateway is powered and reachable.
RS485 A/B is connected, and ground is connected where available.
Local `/status` opens and timestamp or mode data updates.
Local `/data` shows live values or active statuses.
At least one obvious value matches the controller display.
Alarm/status section is readable, not just numeric codes.
Cloud page shows a recent telemetry update when cloud mode is enabled.
Success means the local page shows live values and the MojoScale console receives a recent telemetry update.
Operate
Read values, alarms, and history
Operators should not start with charts. Read current status first, then online state, then primary values, then trends.
Current statusActive booleans, enums, bit flags, and alarms. If something is active, deal with that first.
Primary valuesThe selected scalar readings, such as voltage, current, frequency, RPM, pressure, temperature, fuel, and run hours.
Recent readingsSaved telemetry rows with exact timestamps. Useful when you need the last known value.
TrendsCharts show direction over time. Min/max buckets help avoid hiding short spikes.
Blank vs zeroBlank means unknown or not received. Zero means the device reported zero.
Cloud offline, local worksThe gateway may still be reading the machine locally even when cloud sync is unavailable.
Advanced path
Create a custom profile only when needed
Profiles turn raw Modbus registers into readable values, statuses, and alarms. Use a built-in profile first.
Build or upload a custom profile when the device is not supported or the register map is different.
Manual profile
Best when you are testing a small set of registers or building the profile gradually from the console.
YAML upload
Best when you already have a clean register map and want to create the profile in one upload.
Plain Modbus mistakes to check
Function code 3 vs 4Holding registers and input registers are different read paths. If one gives no value, the manual may require the other.
Slave IDThe device address. Wrong slave ID often looks exactly like no device connected.
Baud rateThe serial speed. Wrong baud can also look like no device connected.
0-based vs 1-based addressSome manuals list 40001 while the actual Modbus address is 0. Others list the raw zero-based address.
Scale factorIf a value is 10x or 100x wrong, the scale is probably wrong.
Word orderIf float or 32-bit values look impossible, word order or byte order may be wrong.
Bit flagsOne register can contain many alarms. Each bit needs a readable label.
Numeric alarmsIf users see numbers instead of names, the profile needs better value maps.
Troubleshooting
Common field issues
Most setup failures are wiring, address, baud, register mapping, Wi-Fi, or cloud connectivity problems. Check the simple things first.
No Modbus responseCheck power, A/B wiring, slave ID, baud rate, and whether the controller is actually exposing Modbus.
Wrong slave IDUse the scan result or controller settings. Try the configured address first, then common addresses.
Wrong baud rateCheck the controller serial settings. Common values include 9600 and 19200.
RS485 A/B reversedSwap A and B if wiring looks correct but the device never responds.
Values are blankThe value was not received. Check function code, address, count, and whether the metric is selected.
Values are zeroZero can be a real device reading. Compare against the controller display before treating it as a failure.
Value is 10x or 100x wrongFix scale or offset in the profile.
Local works, cloud offlineCheck Wi-Fi, MQTT mode, internet, and whether the gateway is intentionally in local-only mode.
Phone cannot open `.local`Some Android networks handle mDNS differently. Try the AP address or local IP if available.
Browser cannot flash gatewayUse a browser with Web Serial support and a USB cable that supports data, not charge-only.
Unsupported device
Request a profile
Do not have a profile for your controller? Send us the manual or register map. We can review whether MojoScale can support it.
What to sendVendor, model, equipment type, register map/manual, desired values, desired alarms, and number of machines/sites.
What happens nextWe review the device, decide whether it can be supported, and turn the register map into readable values and alarms when possible.
Unsupported devices should create profile requests, not abandoned installs. If you have the register map, send it in.
Hardware
Hardware options
MojoScale currently targets ESP32-S3 gateway hardware with RS485 for Modbus RTU. The setup page supports
ESP32-S3 8MB and 16MB firmware targets, and tested hardware is listed in the store.
Buy tested hardware
Use one of the boards listed below. These are mapped to the correct MojoScale firmware target and appear in gateway setup.
Bring your own ESP32-S3
If the board has RS485 and either 8MB or 16MB flash, choose the matching generic ESP32-S3 option during setup.

Waveshare ESP32-S3-RS485-CAN
ESP32-S3 gateway board with RS485, CAN, 16MB flash, USB flashing, terminal power, and a DIN-rail friendly enclosure.
ESP32-S3 16MB firmware
ESP32-S3
16MB flash
RS485
7-36V input
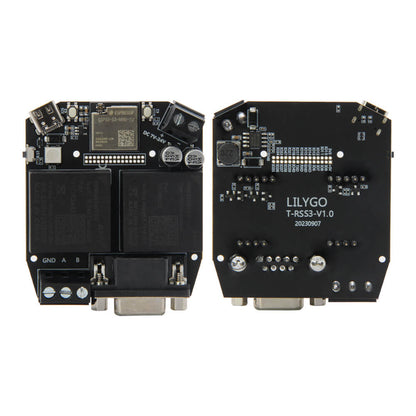
LILYGO T-RSS3
ESP32-S3 gateway board with isolated RS485 and RS232, 8MB flash, USB-C programming, DB9 serial connector, and 7-24V DC input.
ESP32-S3 8MB firmware
ESP32-S3
8MB flash
RS485
RS232
Choosing 8MB vs 16MB
- Choose ESP32-S3 16MB when the board has 16MB flash or the product page says it uses the 16MB MojoScale firmware.
- Choose ESP32-S3 8MB when the board has 8MB flash or the product page says it uses the 8MB MojoScale firmware.
- When using your own hardware, verify RS485 wiring, power range, USB flashing, and flash size before installing in the field.